


This sweater is constructed in 3 steps: knitting (5 pieces total), blocking, and sewing. It sounds more complicated than it really is, I promise. This is a variation of the first sweater I ever knit. I made a few tweaks as I knitted it the first time to make it even easier. You’ll be amazed at how easy it really is.
SIZE
Instructions are written for 6 months. Changes for 12 and 18 months are in parentheses.
KNITTED MEASUREMENTS
CHEST (buttoned) 22 (24 ¼, 26 ½)
LENGTH 8 ½ (9 ½, 10 ½)
UPPER ARM 7 (8, 9)
MATERIALS
2 50g balls (approx 135 yards each you will use just over 1 ½ of this ball) cotton or wool yarn that knits to standard DK tension (MC).
1 50 g ball (approx 135 yard you will use less than 1/3 of ball) coordinating color for trim (CC)
One pair size 7 (4.5mm) needles
Size G/6 (4mm) crochet hook
Stitch Markers
1 3 Coordinating buttons
Measuring Tape
Yarn needle
PROJECT LENGTH
Approx 10 – 15 hours depending on your knitting speed
KNITTING INSTRUCTIONS
BACK
With MC, cast on 52 (56, 60) sts. Work in St (stockinette) stitch until piece measures 8 ½ (9 ½, 10 ½) from beginning. Bind off all stitches.
LEFT FRONT
With MC, cast on 24 (28, 32) sts. Work in St stitch unit piece measures 7 (8, 9) from beginning, end with a RS (right side) row.
Neck shaping
Next row WS (wrong side) Bind off 4 (4, 6) stitches (neck edge), work to end. Cont to bind off at neck edge 3 (4, 4) sts twice, 2 sts once.
Work even until same length as back.
Bind off remaining 12 (14, 16) stitches for shoulder
RIGHT FRONT
Work as for left front, reversing neck shaping by ending the last row before the neck shaping with a WS row and work as follows:
Neck shaping
Next row RS Bind off 4 (4, 6) sts (neck edge), work to end. Cont to work neck decreases at beginning of RS rows as for left front.
SLEEVES
With MC, cast on 28 (30, 34) sts. Work in St st, inc 1 st each side every 10th (8th, 8th ) row 3 (4, 4) times 34 (38, 42) sts. Work even until piece measures 5 (5 ½, 6) from beginning. Bind off all stitches.
Right Side Increase (aka. make one right) DEMO VIDEO
Left Side Increase (aka. make one left) DEMO VIDEO
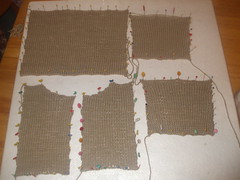
BLOCKING (A brief lesson)
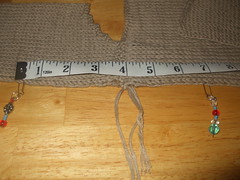
Blocking may be a step in knitting that you often ignore, but without blocking your perfectly-knit garment may look shapeless and sloppy. There are two main types of blocking: wet and steam. The type you choose may depend on the type of yarn you choose, but most types of yarn support wet blocking so that is what I am going to show you today.
You can either immerse the knitted pieces in cool water, squeeze them out and stretch them to their exact measurements on a flat surface, or you can pin the pieces first and then wet them down with a spray bottle. This is a matter of personal preference. I choose to use the spray bottle method because it is easier and seems to dry a lot quicker. Once the pieces are wet, walk away and don’t mess with them. The drying process may take up to 24 hours. BE PATIENT!
(Notes: I use a foam pad that I got from a shipping box to pin my garments to. You can buy a pad from your local craft store. If you don’t want to buy anything – or store it – use a few thick bath towels over a firm pillow or a bed. It works just as well.)
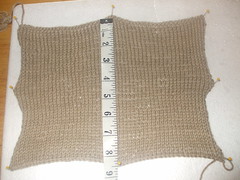
 Step 3: Once all pieces are measured and pinned, get that spray bottle out and soak the pieces. Wait until they are dry before removing pins.
FINISHING
Block pieces to measurements (listed below).

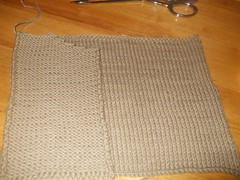
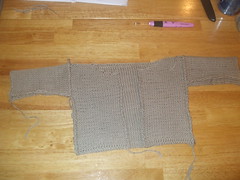
Sew shoulder seams to back (left front and right front to back piece making sure right sides are together) using a whip stitch.
Place markers 3 ½ (4, 4 ½) down from shoulders on front and back.
 Sew sleeves between the marker
s.
 Sew side and sleeve seams.
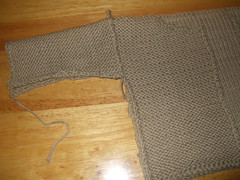
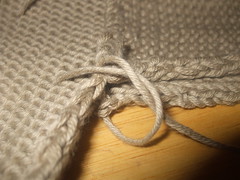
(Notes: I like to tie a temporary knot in the arm pits and, cuff, and bottom of sweaters to make sure everything stays lined up while I sew pieces together.)
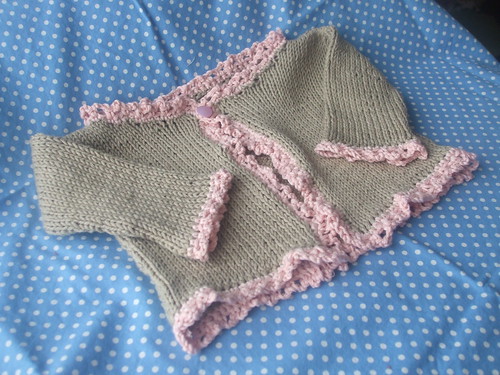
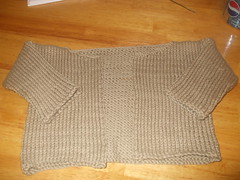
After sewing all of the seams and weaving in loose ends, your sweater should look like this:
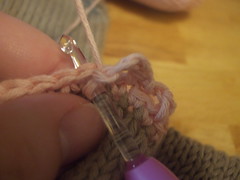
With RS facing, crochet hook and CC, work 1 row SC (single crochet) around lower, front and neck edges.
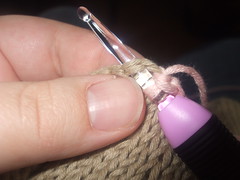

Do not turn. Working from left to right, work 1 row SC in each stitch. Fasten off. Do the same around wrists. To work 3 button holes, on right front, work, chain 3, skip 1 stitch for each button hold. Place the first at top of neck and 2 others spaced 2 apart.
(Notes: I did a different edging because I wanted a more girly edge. After I went around the entire sweater in a single crochet, I continued by working one sc, then making 3 chains, skipped one sc, and then sc into every 3rd sc. I am not much of a crocheter, so sorry this explanation is a little vague. As always, check the internet. There are tons of tutorials.)
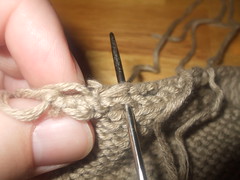
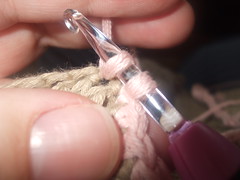
Single crochet in an already existing single crochet:
 Work 3 chains, skip 1 single crochet
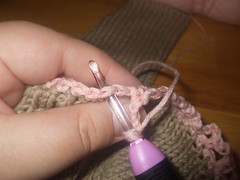 Work single crochet and start over
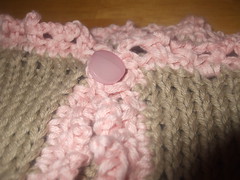
 (Notes: This is the same technique used to make button holes mentioned above. Because I already had the scalloped edge all around the sweater, I just picked a place to add a button. I decided I only wanted one at the very top. You can add as many or as little buttons as you’d like.)
ADDITIONAL PROJECT HINTS
- For a more girly edge, after crocheting around sweater once, choose a fancier crochet edge.
- Add as many or as little buttons as youd like.
- You can add pockets by knitting small squares and stitching them to the front.
- To add some flare, knit arms a different color than the front and back and crochet coordinating colors around edges.
- You do not have to add a crochet edge, but working one or two rows of single crochet hides uneven edges and can add a more decorative finish.


This is so adorable! I know how to crochet, but now I’ve got to learn to knit so I can make this sweater.
Lori, great job. The sweater looks amazing. I actually think I might be able to handle this one. I am going to be the sweater queen by the time this winter is over.
thank you for share this tutorial !!
This is an excellent tutorial! The pictures were great and really really helpful!
these directions are amazing! very detailed! I want to make this for my daughter, it’s so cute.
THANK YOU SO MUCH FOR THIS POST! I STUMBLED ACROSS IT BUT ITS FABULOUS – IM SO HAPPY I FOUND YOUR BLOG! XOXO
RENEE